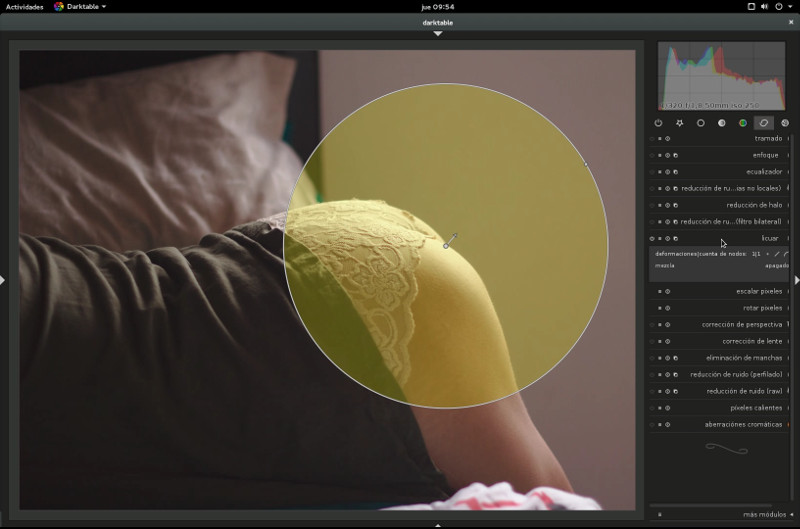
If something is true when you edit photos, is that you try to capture your subject just as it is, but in a world saturated by “perfection” your clients always ask a bit of retouch; sometimes not even due the person insecurity, but more due symmetry. The truth is that the IWarp tool at GIMP had become my BBF when moving things around was needed, but as always, darktable keeps adding amazing things so my workflow (develop and post-production) happens completely inside this single app.Liquify is one of the newest modules that can be found at darktable and offers a versatile way of moving pixels around by applying free style distortions to parts of the image. There are three tools to help doing that: points, lines, and curves. There is a limit of 100 nodes in a single liquify instance. However, take into account that the liquify module requires a lot of computing resources.You can drag the central point of a node to move the node around. The radius describes the area of the applied effect: the distortion occurs only inside this radius. To change the radius drag the handle at the circumference. A strength vector starting from the center describes the direction of the distortion, and its strength is depicted by the length of the vector. You change the vector by dragging its arrowhead.[cq_vc_videocover videoimage=”6292″ imageshape=”square” overlaytype=”icon” iconshape=”circle” iconbgcolor=”#dd3333″ videolink=”https://youtu.be/tv1Xn41pveg”]
Darktable’s Liquify, direct Raw distortion
Written By :
Category :
arte
,Fotografía
,General
,guias
,Linux
Posted On :
25 August, 2016
Share This :
2 Comments On “Darktable’s Liquify, direct Raw distortion”
umm interesante: y ano son diseñadores sino los predecesores de los politicos actuales: masters of the liars! increible coo evolucionan las ramas de trabajo
Nice tool