theme-sticky-logo-alt

Add a mQtranslate language selector to your header

0 Comments

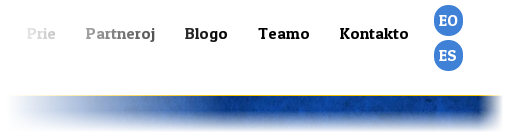
After a massive migration of all my personal and clients websites to mQtranslate, there are some things that you need to add, mostly, when you work with custom front pages, one of those is the language selector at the header.

Process as always is quite simple, so let’s get to it. First is to add the instruction that calls the active languages to the header:<?php qtrans_generateLanguageSelectCode(); ?>Then, you just need to add some stile. I would recommend you to add all the css tags for each language you will use, since right now, i haven’t found an easy way to add them automatically without needing jquery (if you know a better way, please let me know!)As you can see, is quite simple; and with a good style things won’t look too crappy. For this example I used a rounded icon shape using just css (border-radius) and the theme color. Try to not use images, so you can change it easily.

You will always have the option to add a personalized widget to your header, and from the admin just drag the mQtranslate box. Mostly, this method is due curiosity… curiosity is what makes us learn something different every day.qtrans_language_chooser {
display: inline;
list-style: none;
float: right;
margin-top: 10px;
}

.lang-eu {
background: rgb(62, 129, 214);
border-radius: 20px;
padding: 5px;
}

.lang-es {
background: rgb(62, 129, 214);
border-radius: 20px;
padding: 5px;
margin-bottom: 4px;
}

.lang-es a, .lang-eu a {
color: #ffffff;
font-family: ‘Patua One’, cursive;
text-align: center;
}


Help tatica and donate with paypal!

Agregar selector de idiomas de mQtranslate al header

0 Comments

Luego de que migré todos mis sitios y los de mis clientes a mQtranslate, hay ciertas cosas que hay que agregar a mano cuando trabajas con Páginas Principales personalizadas, una de ellas es agregar el selector de idiomas a la cabecera.

El proceso, como siempre es bastante simple, así que vamos a por el. Lo primero es agregar la instrucción al header, que será la que muestre los idiomas:<?php qtrans_generateLanguageSelectCode(); ?>Luego de ello, solo tenemos que darle estilo. Les recomiendo que de una agreguen en el css las etiquetas con los idiomas que utilizarán, ya que por ahora, no encontré una forma de aregar automáticamente la variable del idioma a la etiqueta css sin utilizar jquery (Si conocen una, me la hacen llegar).Como ven, es bastante sencillo, y con un buen estilo la cosa no se ve tan fea. Para este ejemplo utilicé la forma de iconos redondos (con border-radius) y del color del theme, lo bueno es que, como no son imagenes, pueden darle todo el estilo que quieran.

Otra forma que tienen es la de agregar un widget en el header y desde el admin, colocar la caja de mQtranslate; sin embargo, este es otro método en caso de que no quieran que sus usuarios anden tocando a cada rato el box. Las formas sobran, pero en mi caso (y quizás más por curiosidad que por otra cosa), decidí agregar el php y así, conocer un poco más el funcionamiento interno de mQtranslate. La curiosidad es la que nos hace aprender algo diferente todos los días.qtrans_language_chooser {
display: inline;
list-style: none;
float: right;
margin-top: 10px;
}

.lang-eu {
background: rgb(62, 129, 214);
border-radius: 20px;
padding: 5px;
}

.lang-es {
background: rgb(62, 129, 214);
border-radius: 20px;
padding: 5px;
margin-bottom: 4px;
}

.lang-es a, .lang-eu a {
color: #ffffff;
font-family: ‘Patua One’, cursive;
text-align: center;
}


Help tatica and donate with paypal!

Previous Post
QuizUp: Knowledge quiz
Next Post
Tap.pics is online… thx to Uniregistry!

0 Comments

Leave a Reply

15 49.0138 8.38624 1 0 4000 1 https://tatica.org/en 300 0